
Član VIP

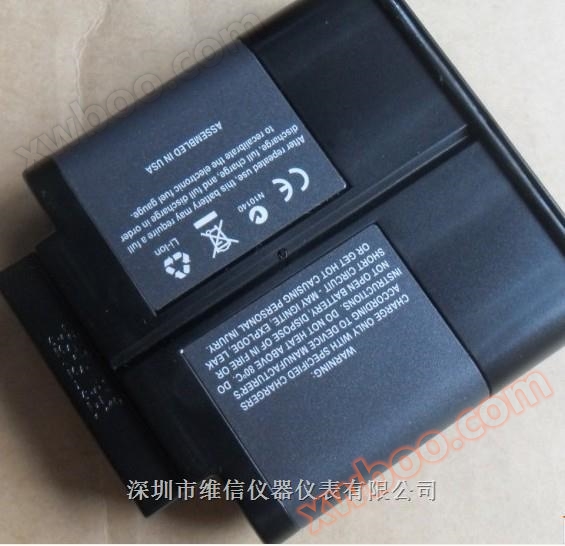
FLUKE Ti50 series rechargeable battery
FLUKE Ti50 series rechargeable battery
Detalji proizvoda
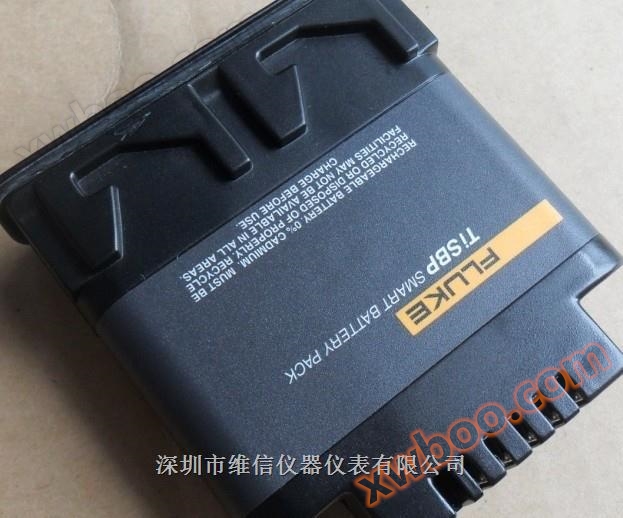
Original yamFLUKE-TiSBP SMART BATTERY PACK 7.4V
FLUKE-TiR2, TiR3, TiR4, Ti40, Ti45, Ti50, Ti55 IR FlexCam Thermal Imagers ye 7 volt lithium-ion battery charge
Fluke TI50 series rechargeable battery
FLUKE Ti40 Ti45 Ti50 TI55 Infrared Thermal Imager (Infrared Thermal Imager) Baterii ye kɔnɔ ye kɔnɔ ye kɔnɔ ye kɔnɔ ye kɔnɔ ye kɔnɔ ye kɔnɔ ye kɔnɔ ye kɔnɔ ye kɔnɔ ye kɔnɔ ye kɔnɔ
Battery Type Lithium Ion Smart Battery, Can be replaced on site
Bateri luɔɔi
Waktu
Luɔi 3 hours
Lɔ̈k bateri ku lɔ̈k bateri
Ka tɛmɛ lɛr 3 ka tɛmɛ bateri. Lɔ̈k ba bateri ye tɔ̈u thïn ya tɔ̈u. Sa charger
Ka LED ye kɛnɛ ye kɛnɛ ye kɛnɛ ye kɛnɛ ye kɛnɛ ye kɛnɛ ye kɛnɛ ye kɛnɛ ye kɛnɛ ye kɛnɛ ye kɛnɛ ye.
FLUKE Ti50 series rechargeable batteries
Yïn alëu ba kɔc ye kɔc ye kɔc ye kɔc ye kɔc ye kɔc ye kɔc ye kɔc ye kɔc ye kɔc ye kɔc ye kɔc ye kɔc ye kɔc ye kɔc ye kɔc ye kɔc ye kɔc ye
Lɔ̈k ba bateri tök laar.
eii002.eps
Jaa 1-2. Bateri FLUKE Ti45 Ti-SBP Infrared Thermal Camera Lithium Ion Smart Battery TISBP
Lëk thermal cameras ku bateri wël
Tab "Information" wɛ̈t "Thermal Camera Information" wɛ̈t "Information" wɛ̈t "Thermal Camera Information" wɛ̈t "Thermal Camera Information" wɛ̈t "Thermal Camera Information" wɛ̈t "Thermal Camera Information" wɛ̈t
Walisa infrared refresh rate, infrared image size (pixels), zoom function,
IR-Fusion ® (Infrared fusion) function, thermal camera serial number, software version, each used
Lens description (if more than one), calibration range, number of images on memory card, and storage (n'a juëc ye raan tök ye fotow tɔ̈ɔ̈u, ka fotow tɔ̈ɔ̈u, ka fotow tɔ̈ɔ̈u, ka fotow tɔ̈ɔ̈u)
Size of the used and available space on the card. Dɛ̈ɛ̈r ye tɔ̈u thïn ku dɛ̈ɛ̈r ye tɔ̈u thïn.
Ba kunnafoniw tɔ̈u tab "Information":
1. Lɔ̈k F.
2. Luɔ̈ɔ̈i mouse controller, tɔ̈ɔ̈u pointer në "Hot Camera Information" në pop-up menu, ku klik
E。
3. Lɩk pointer-dɛ "Information" tab-dɛ la E-dɛ.
4. Lɛ̈k pointer në arrow nhial ku piny, ku scroll ku tïŋ wël kɔ̈k peei.
5. Click "trigger" button to go back to the scanning target mode.
Thermal Camera KuenBateri laar
Yïn ye thermal imager tɔ̈u thïn, a tɔ̈u thïn, a tɔ̈u thïn, a tɔ̈u thïn, a tɔ̈u thïn, a tɔ̈u thïn, a tɔ̈u thïn, a tɔ̈
A ye tɛmɛ, a ye tɛmɛ 50 wala 60 Hz. Charger tɔ̈ re-calibration function, tɔ̈u tɔ̈u tɔ̈u tɔ̈u tɔ̈u tɔ̈u tɔ̈u tɔ̈u tɔ̈u tɔ̈u tɔ̈u
Kuantite monitoring effect. Na ye bateri tɔ̈u thïn, bateri ye nyuɔɔth në taskbar de thermal camera display
* dɛ̈ɛ̈r. Lɛ̈k bɛ̈ɛ̈i ye tɔ̈u në Table 8-1.
Tabel 8-1. Battery Power Indicator ye tɔ̈u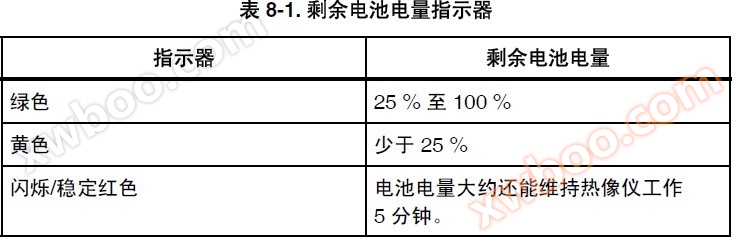
Indikator Bateri ye tɔ̈u
25% ka tɛmɛ 100%
Yellow wala 25%
Bateri ye tɛmɛ/ye tɛmɛ/ye tɛmɛ/ye tɛmɛ/ye tɛmɛ/ye tɛmɛ/ye tɛmɛ/ye tɛmɛ/ye tɛmɛ/ye tɛmɛ/ye tɛmɛ
5 minit.
Tïŋ mouse controller, ka pointer tɔ̈ në battery icon. E ye tɔ̈ɔ̈u ba bateri ye tɔ̈ɔ̈u
Ku tɛ̈n yenë thermal cameras luui thïn.
TiR2,TiR3,TiR4,Ti40,Ti45,Ti50,Ti55
Manual de luɔi
8-4
Ba bateri thermal cameraŋ laar:
Lëk
Lɛ̈k 3 tɛ̈n yɔ̈ɔ̈r ka tɛ̈n yɔ̈ɔ̈r ka tɛ̈n yɔ̈ɔ̈r ka tɛ̈n yɔ̈ɔ̈r. Bateri fila ye laar. Ha
Ka tɛmɛ bateri dɔ̈ɔ̈r, a tɛmɛ bateri dɔ̈ɔ̈r tɔ̈u në standby mode.
1. Lɔ̈k battery charger AC power tënë power socket. U.S. tɛ̈ɛ̈n, a lëu bï a wïc socket
Adapter.
2. Lɔ̈k riɛl në bateri charger ye kɔc yiic.
3. Bateri dɔ̈ɔ̈r dɔ̈ɔ̈r dɔ̈ɔ̈r dɔ̈ɔ̈r dɔ̈ɔ̈r dɔ̈ɔ̈r dɔ̈ɔ̈r dɔ̈ɔ̈r. *** Bateri (na
a) Lɔ̈k në charger seat**.
LED ye tɛ̈n yen yen yen yen yen yen yen yen yen yen yen yen yen yen yen yen yen yen yen yen yen yen yen yen yen yen yen yen yen yen yen yen yen yen yen yen yen yen yen yen yen yen yen yen yen yen yen yen yen yen yen yen yen yen yen yen yen yen yen yen yen yen yen yen yen yen yen yen yen yen yen yen yen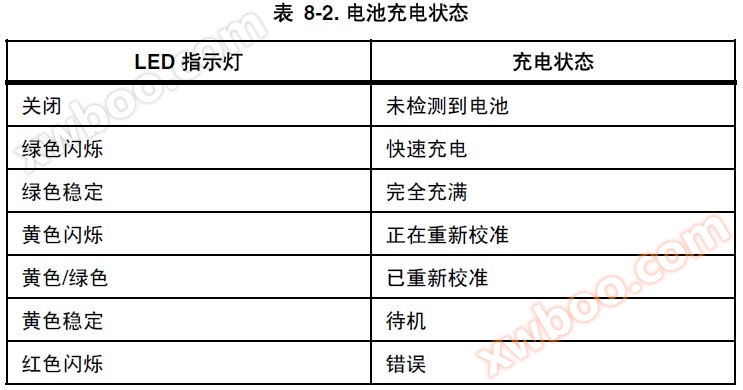
Tabel 8-2. Bateri laar
LED wɛ̈t ye nyuɔɔth
Off Bateri ka yök
Green Flashing Charging telim
Green Stable Full
Yellow flashing ye kalibre ye
Yellow/Green Aci kalibre
Yellow Stable Standby
Red Flashing Error
Kalibrɛ bateri
Bateri ye thermal cameraŋ looi adhil bï ya kalibrɛ ye waati ka waati ago bateri ya tɛmɛ ka tɛmɛ ka tɛmɛ ka tɛmɛ ka tɛmɛ ka tɛmɛ ka tɛmɛ ka tɛmɛ. Ni bateri wïc
Calibrate again, a warning pop-up will appear on the thermal camera display when you open the thermal camera, a warning pop-up will appear on the thermal camera display
Kɔl.
Thermal Camera Kuen
Bateri dɔ̈ɔ̈r 8
8-5
Lëk
A lëu bï lɛ̈ɛ̈r 16 tɛ̈n yen yen yen yen yen yen yen yen yen yen yen yen yen yen yen yen yen yen yen yen yen yen yen yen yen yen yen yen yen yen yen yen yen yen yen yen yen yen yen yen yen yen Yïn alëu ba tɛ̈n ye tɔ̈u tɔ̈u tɔ̈u tɔ̈u tɔ̈u tɔ̈u tɔ̈u tɔ̈u tɔ̈u tɔ̈u
Bateri bɛ̈n ya tɔ̈ɔ̈u, ku bɛ̈n ya tɔ̈ɔ̈u bɛ̈n ya tɔ̈ɔ̈u bɛ̈n ya tɔ̈ɔ̈u bɛ̈n.
BaKalibre bateri:
1. Lɛ̈k bateri në baŋ gɛɛr de bateri charger.
2. Lɔ̈ɔ̈m kɛ̈ɛ̈r ye cɔl calibration button ye cɔl charger.
Bateri dɔ̈ɔ̈r
Bï bateri ya tɔ̈ɔ̈u (të cenë thermal camera ye bateri ya tɔ̈ɔ̈u ka tɔ̈ɔ̈u ka tɔ̈ɔ̈u ka tɔ̈ɔ̈u)
Ka tɛmɛ minit 5 ka tɛmɛ (ka tɛmɛ ka tɛmɛ ka tɛmɛ ka tɛmɛ ka tɛmɛ ka tɛmɛ ka tɛmɛ ka tɛmɛ ka tɛmɛ ka tɛmɛ)
Standby mode. Na tɛ̈n yen tɛ̈n yen tɛ̈n yen tɛ̈n yen tɛ̈n yen tɛ̈n yen tɛ̈n yen tɛ̈n yen tɛ̈n yen tɛ̈n yen tɛ̈n yen tɛ̈n yen
Masin dɔ̈ɔ̈r. Yïn alëu ba rot waar në mode de standby.
Walasa ka tɛmɛ tɛmɛ tɛmɛ tɛmɛ tɛmɛ tɛmɛ tɛmɛ tɛmɛ tɛmɛ tɛmɛ tɛmɛ tɛmɛ tɛmɛ tɛmɛ tɛ D ye green ye.
Walasa ka tɛmɛ tɛmɛ tɛmɛ tɛmɛ tɛmɛ tɛmɛ tɛmɛ tɛmɛ tɛmɛ tɛmɛ tɛmɛ tɛmɛ tɛmɛ tɛmɛ tɛ D A tɛ̈ɛ̈m kɛ kɛ̈ɛ̈r ye kɛ̈ɛ̈r ye kɛ̈ɛ̈r ye kɛ̈ɛ̈r ye.
N'a fãa a tɔ̈ɔ̈u wala a tɔ̈ɔ̈u, a tɔ̈ɔ̈u D looi looi looi looi looi looi looi looi looi looi looi looi looi looi looi looi looi looi looi looi looi looi looi looi looi looi looi. Sa a tɛmɛ, D tɛ̈n tɛ̈n tɛ̈n tɛ̈n tɛ̈n tɛ̈n tɛ̈n tɛ̈n tɛ̈n Ni
Na cï yen tɔ̈ɔ̈u, ka tɛ̈n ye tɛ̈n ye tɛ̈n ye tɛ̈n ye tɛ̈n ye tɔ̈ɔ̈u.
Walasa ka tɛmɛ tɛmɛ tɛmɛ tɛmɛ tɛmɛ tɛmɛ tɛmɛ tɛmɛ tɛmɛ tɛmɛ tɛmɛ tɛmɛ
1. Lɔ̈k F.
2. Luɔ̈ɔ̈i mouse controller, ka pointer tɔ̈u "Hot Camera Settings" në pop-up menu.
3. Klik E.
4. Yik pointer ye "Power" tab lan, ku E.
5. Lɛ̈k pointer ye "standby time-out" ye tɛ̈n tɛ̈n tɛ̈n tɛ̈n tɛ̈n tɛ̈n tɛ̈n tɛ̈n tɛ̈n
6. Lɛ̈k ka tɛ̈n tɛ̈n tɛ̈n tɛ̈n tɛ̈n tɛ̈n tɛ̈n tɛ̈n tɛ̈n
7. Click "trigger" button to accept settings changes and return to scanning target mode. 7. Click "trigger" button to accept settings changes and return to scanning target mode. 7. Click "trigger" button to accept settings changes and return to scanning target mode.
Viewing Camera and Battery Information
The Info tab within the Camera Info window contains a list of key features
such as IR refresh rate, IR image size (in pixels), zoom capabilities, IRFusion
® capabilities, camera serial number, software versions, lens
descriptions of each lens used (if more than one), calibration range, number of
image files on the memory card, and the used and free space on the memory
card.
To view the Info tab information:
1. Tap F.
2. Use the mouse controller to position the pointer over Camera Info on the
popup menu and tap E.
3. Position the pointer over the Info tab and tap E.
4. Position the pointer over the up/down arrows to scroll and see additional
details.
5. Tap to return to scan target mode.
Camera Care
Charging the Batteries 8
8-3
The Battery tab within the Camera Info window shows the power source,
remaining battery charge level, and battery manufacturer, serial number, and
number of discharge cycles.
To view the Battery tab information:
1. Tap F.
2. Use the mouse controller to position the pointer over Camera Info on the
popup menu and tap E.
3. Position the pointer over the Battery tab and tap E.
4. Tap to return to scan target mode.
Charging the Batteries
Your Camera comes with a battery charger that works with 100 to 240 V AC
input voltage and 50 or 60 Hz input frequency. The charger has a recalibration
feature to maintain correct capacity monitoring. When using battery power, a
battery symbol appears in the far right side of the camera display screen task
bar. The remaining charge capacity is indicated as shown in Table 8-1.
Table 8-1. Remaining Battery Charge Indicators
Indicator Battery Power Remaining
Green 25% to 100%
Yellow Less than 25%
Flashing/Solid Red Approximately 5 minutes until camera
powers off.
Use the mouse controller to position the pointer over the battery icon. Press
E to obtain an estimate of the remaining battery charge and camera runtime.
TiR2,TiR3,TiR4,Ti40,Ti45,Ti50,Ti55
Users Manual
8-4
To charge camera batteries:
Note
Charge at least one battery for 3 hours before use. Two batteries
charge sequentially. The second battery remains in standby mode
until the first battery is charged.
1. Connect battery charger AC power supply to a power outlet. An outlet
adapter may be necessary outside of the United States.
2. Connect the power supply to the dual-bay battery charger.
3. Insert one battery into one of the battery charger bays; insert the second
battery—if available—into the second charger bay.
The LED indicator in front of each bay indicates the charging status as shown
in Table 8-2.
Table 8-2. Battery Charging Status
LED Indicator Charging Status
Off No battery detected
Green Flashing Fast charging
Green Solid Fully charged
Yellow Flashing Recalibrating
Yellow/Green Recalibrated
Yellow Solid Standby
Red Flashing Error
Recalibrating the Batteries
You should recalibrate your camera batteries periodically to maintain the
accuracy of the battery gauge. If a battery requires recalibration, a warning
popup window appears on the camera display screen when you power on your
camera.
Fluke TI50 series rechargeable battery
Original yamFLUKE-TiSBP SMART BATTERY PACK 7.4V
Онлайн разпит
-
Kontakti
-
Kompanija
-
Telefon
-
E-mail
-
WeChat
-
Kod provjere
-
Сједност поруки
-